
Installing and Configuring the Java Plug-in for Java Applets ~~ For Windows
Confirm the Java Applet Settings
Verify that you have the proper Java Applet Settings.
Note: For the requirements and configurations for the OS and Web browser, please see the section on ActiveAssets Client System and Configuration Requirements.
Verify the Java Plug-in settings in the Web Browser (Internet Explorer).
Open Internet Options from the Internet Explorer Tool Menu.
Select the Advanced tab, and verify that the Java (Sun) item is present.
If you don't see the “Java (Sun) item, this means the Java plug-in has not been installed. Installation is necessary, please refer to the Automatic Java Plug-in Installation.
If you do see the “Java (Sun)” item, verify that the box is checked next to “Use JRE 1.5.0_xx for the <applet> ”. If it is not checked, then check it.
Click the “OK” button, and restart the browser.
How to handle the messages displayed when using applets.
When you see the various messages displayed while using applets, please handle them as explained below.
When the security certificate confirmation screen appears: This is the screen that confirms that Java is operating correctly on your system. Approve of the operation by clicking the Yes button.

=> Go to the section on Verifying the Java Applet electronic certificate.
What to do when the Java install prompt appears: This confirms that the Java Plug-in is not installed. To continue, start the install process.

=> Auto installing the Java Plug-in
The ActiveAssets Multiple Upload and Download Applets are blank: When you see this, this means that for some reason, the Java Plug-in has not been installed properly. You will need to manually install the Java Plug-in at this point.
![]()
=> Manually installing the Java Plug-in
Verifying the Java Applet electronic certificate
The following warning message dialog illustrates the Security Certificate acceptance screen. This appears when performing Multiple Uploads or Downloads.
Click Yes and the Multiple Upload/Download applet will display.
Click Always and the Multiple Upload/Download applet appears, and this dialog will not display with subsequent applet usage.
Auto installing the Java Plug-in
If the Java Plug-in has not been installed, you will be prompted to do so. Follow the wizard, and perform the installation.
Click Install to begin the installation.
The following screen will appear. The installation preparation will begin.

After the installation preparation has concluded, the “Java 2 Runtime Environment SE v1.4.2_x” usage license screen will be displayed. Click the Agree radio button, then click Next .
Next you will see the “Setup Install Type” screen. Select one of the radio buttons, and click Next.
The Installation will now begin.
After the installation has finished, you will see the InstallShield Wizard Completed” screen. Click the Finish button.
The next time you use the ActiveAssets Multiple Upload feature, You will see the Security Certificate acceptance screen. Click Yes, or Always.
You will be returned to the ActiveAssets Multiple Upload or Download screen. If you see a screen like the one below, the installation procedure has fully completed.

Note: In the following, you do not need to follow the same Installation Procedure.
To insure that the Java Plug-in has been installed correctly please verify the Java Applet settings, as described above. Verify that the check box next to “Use Java 2 v1.4.2_xx for the <applet> ” is checked.
Verify that “Java 2 Runtime Environment, SE v1.xx_xx” is displayed in the “Add and Remove Programs” system control panel.

Note: You can verify which are the latest versions of the Java Plug-in and Web Browser by looking at the System Requirements section of the FAQ.
Manually installing the Java Plug-in
If you see a blank screen when trying to use the Multiple Upload or Download applets, this means you are lacking a compatible version of the Java Plug-in. Please follow the instructions below to manually install the Java Plug-in.
Please first log out of ActiveAssets prior to downloading the plug-in.
Sun Microsystems is the developer and distributor of the Java Plug-in. Go to their Java Plug-in page, as listed below, and begin the installation process. See http://java.sun.com/j2se/1.4.2/download.html.
Find the J2SE v1.4.2_xx JRE version, and click the Download J2SE JRE link.
The Download page is displayed.
Click the Accept radio button, and click the link for “Windows Offline Installation, Multi-Language” in the “Windows Platform-Java(TM) Runtime Environment, Standard Edition 1.4.2_xx” section.
The file download confirmation dialog is displayed.
Click the Run button, and the auto install process begins.
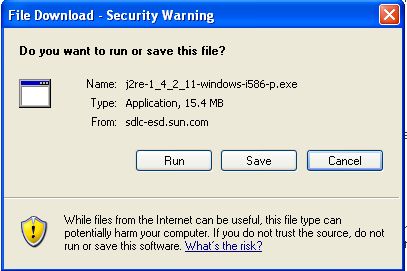
=> For more information on this, see Step 4 of the Auto installing the Java Plug-in section of this document.
If you select Save instead of Run in the download confirmation dialog, an executable file will be downloaded instead. After downloading this file, double click on it to begin the installation process.
After downloading, you will see a file named j2re-1_4_2_xx-windows-i586-p.exe

After the installation
has started up, the “Java 2 Runtime Environment SE v1.4.2_x” usage license
screen will be displayed. Click the Agree
radio button, then click Next.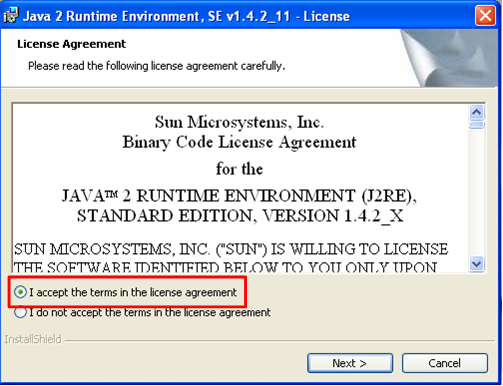
=> For the rest of the steps to install, please follow from step 4 of the Auto installing the Java Plug-in section of this document.